Saturday, December 22, 2012

Make Your Own Go Set

My husband and I love playing games - especially board games. We have a games bookcase that's full of our favorites, but the one we play the most is Go.

The game of Go originated in ancient China, and the rules are fairly simple - players take turns placing colored stones on the board, attempting to capture their opponents stones by surrounding them with their own. However, the game itself becomes pretty complex. I won't get into all the intricacies, but there's a great tutorial that will quickly and easily teach you how to play here.

One of the reasons why we love Go so much is because we made our own game set. We wanted to be able to toss the set in our pockets or my purse and go to coffee shops or the park to play.  It was one of the easiest projects we've ever done, and also one of the most useful, so I thought I'd share how we did it.

All you need to make your set is some glass stones (sometimes called vase filler gems, like these), fray check (optional, to apply to the cut edges of your boards), and sturdy (canvas or similar) polka dot fabric - the only catch here is that the dots on the fabric have to line up exactly in both rows and columns for the fabric to be usable.
The workable print, on the left, is Michael Miller Disco Dot
Once you have your fabric, use the dots as your guide to cut it. A standard go board would be 19 dots by 19 dots, but you can also play on a 13x13 or 9x9 board. We cut boards of all three sizes, and use them all regularly, depending on how much time we have to play. If desired, apply the fray check to the edges of your board - this will help make sure no stray strings unravel from the cloth. Then use the leftover fabric to sew two drawstring bags  for the florist beads to go in (or just toss the beads into ziplocks, if you're not the sewing type)... and that's it!


This would make a great last second gift - it only takes a few minutes to make. Swing by the bookstore and pick up a book on how to play Go, or just refer them to this website in your card, and you're all set!

Enjoy your new game!

Monday, December 17, 2012

Three easy DIY toys for open-ended play with kids

One of the things I love most about this time of year is how excited so many people get to spend time with their families and friends over the holidays.In all the excitement, though, there are always unexpected lulls. Your plane is late, or dinner in a restaurant is taking longer than expected to come... and these are the trickiest times when you're hanging out with young children.

It can be even harder when you're with children that you love, but don't hang out with very often. Of course you can toss on a movie or watch them play with their DS, but all that traveling was so that you could actually hang out with them, right? Whether you're their awesome uncle or their godmother from another state, here are some new ideas to help you have fun and connect with the children in your life. Make them in 30 minutes or less, toss them in your bag, and you'll be prepared no matter how unexpected the lull.

1) Felt Tangrams: Tangrams are a type of traditional Chinese puzzle. Essentially, they are a square cut into seven pieces: 2 large triangles, 1 medium triangle, 2 small triangles, a square, and a parallelogram. Of course, if you'd like to go a less "traditional" route, you can cut out all kinds of shapes - the possibilities are really endless. Then arrange these shapes to make all kinds of pictures -  animals, houses, monsters, robots, and more! Tell stories about the pictures you each make, or challenge each other to see who can make a certain animal the most quickly. As a great challenge for school age children, ask them to use all the tangram pieces to form one square - its harder than it looks.
To make your own travel tangrams, just cut one large piece of felt into a square to be your base. Then, from a smaller square of felt, cut out the tangram pieces, as shown. Since felt sticks to felt, you can place the smaller pieces on the one base piece, roll it up, stick it in your bag, and go.
As a bonus, bring along the book Grandfather Tang's Story by Ann Tompert, which will teach you how to make even more tangram figures!


2) Circle Builders: For kids who are all about building, whether it be with Legos and blocks, introduce them to a new kind of construction. These circle builders are super simple to make: first, laminate a few different colored sheets of cardstock (either with a fancy laminating machine, or the cheaper-but-just-as-effective way, with many strips of packing tape). Next, cut out many small circles - I cut a total of thirty 2.5" inch circles out of three different colors of cardstock. Then, cut four slits in each circle: one at the top, one at the bottom, and one on each side. Each slit should extend from the edge halfway to the center of the circle. Place them all in a small tin, or just rubber band them together.
To build with these, simply line up two of the slits and slide the circles together. One circle will be vertical, and the other horizontal. Continue sliding circles on - you can build shockingly tall structures this way! These circles are easy to build with once you get the hang of it, but they can be kind of finicky at first, so this is a great toy for kids who are super into building or who love a challenge.

3) Tinkering Kit: For slightly older kids (who are past the stage of putting small objects in their mouths), a great, creative toy is a tinkering kit. Put random items that can be combined in interesting ways into a box or tin (I used a random clear box I had lying around the house). In my kit, I put cut up drinking straws, two sizes of popsicle sticks, pom poms, rubber bands, buttons, mosaic squares, pipe cleaners, and a small roll of washi tape.

To adults, this might seem like a pile of junk... but I have done this project many times with young children, and all they see is possibility! Giving them the freedom to create whatever they'd like leads to so much creativity. Using these or similar supplies, I have seen kids build the coolest robots, most unique sculptures, a menagerie of animals, and much, much more. Get your creative juices flowing and build something alongside them! Its a great form of open-ended play that leads to great conversations.

Have fun hanging out with the kids in your life this holiday season!


Thursday, December 13, 2012

DIY Journals

I love journals. There's something about blank books that just really call to me - I've kept written journals since I was a child, and now as an adult, I also art journal. I just can't get enough of the process of turning the emptiness of a blank book into a record of the world around me.

That said, journals are often very expensive! There are tons of gorgeous handmade options on Etsy if you're looking:

Foil Stamp Pocket Journ...
$17.00

Deer in Profile - Moles...
$10.00

Coptic Bound Travel Jou...
$33.00

small leather journal h...
$15.00

However, it's also easier than you think to make your own journals at home, and you probably already have all the supplies you need! You can use any kind of paper you'd like, depending on what you plan to use the book for.

For my journal, I chose to use cardstock for the cover and 5 sheets of water color paper for the inside pages. Other than your papers, all you really need is a sharp needle, some very strong thread (strong enough that if you loop it around your fingers and pull, you won't be able to break it without it cutting into your fingers), and either a bone folder or a ruler.


 The first thing you need to do is cut all of your paper to the same size. I wanted my finished journal to be 4.5" by 5.5", so I cut my paper to be 9" wide and 5.5" tall. Then fold each sheet in half. 


Using a sharp needle, poke 3 holes in each sheet -  one about 3/4" from the top, one in the center, and one about 3/4" from the bottom. Then thread your needle, and insert it through the center hole, starting from the inside of your book and ending on the outside. Leave a long tail (about 3") of thread dangling inside the book.


Next, insert the needle in the top hole, starting from the outside of the book and ending on the inside.Then insert it into the bottom hole (starting inside, ending outside), and then back through the center hole (starting outside, ending inside). Cut the thread, again leaving a tail about 3 inches. 


Tie the two tails of thread together inside the journal, then clip them close to the knot. Fold the journal along the spine and use a bone folder or ruler to go over the crease a few times to ensure that your journal will lay flat. 


 You can then decorate the cover of your journal however you'd like - I added a stamped circle of a coordinating color of cardstock (anatomical heart stamp from Blossom Stamps on Etsy).

I also think that these little books could be adorable monogrammed, or made with patterned papers, and used as a stocking stuffer for the holidays. Make one for yourself to brighten up making your grocery lists, to toss into your purse, or to record your New Years Resolutions.


These are the simplest type of DIY journal. If you're interested in bookbinding, you'd be surprised at how easy it is to make even your own hardcover, bound books. I make many different kinds of books for my own use - if you'd like to learn how, feel free to comment or send me an email and I will point you to some resources!

Hope you are having a wonderful day!


Tuesday, December 11, 2012

Technicolor Snowflakes

Paper snowflakes are such a classic children's craft - and there's definitely a reason. They're easy to make, are fitting for any winter holiday, and the excitement of unfolding the snowflake at the end just lights up children's faces.


I have been making these with the children I work with for the last few years, because they look so cheerful hanging in our after-school program's windows. I have made a couple adaptions to the classic fold-some-white-copy-paper-and-cut version of this craft to make it more bright and colorful in our dark winter room, and to make it more accessible for children of all ages.


The first change I made was to switch from paper to coffee filters. Even with the thinnest paper, it can be tricky for young children to cut shapes out from the several folded layers you need for snowflakes. Coffee filters, though, are great - not only are they already the perfect shape and size for a snowflake, they are so thin that even young children can cut them.

I iron all the coffee filters before giving them to the children (you can iron a whole stack of coffee filters at once, and it works perfectly well). I show them how to fold them in half three times:


Then, all they need to do is cut out shapes. I try to emphasize cutting out several big shapes that don't touch - but I never micromanage their projects, so whenever they feel like they're done, they come up to me. Then comes the really fun part - adding the liquid watercolor!

You could also use pan watercolors, but I use liquid watercolors because they are so much more vibrant. I have the kids come up to me one at a time, place their unfolded snowflake in a box lined with newspaper and spray away. We talk about complimentary colors and color families, and when they're done, they place the snowflake on a table lined with newspaper to dry.

(If you don't have any spray bottles, you could easily have your kids paint the coffee filters before cutting into them. Just be sure that they are dry before beginning to cut!)

Since coffee filters are so cheap, this is one craft that they can repeat as many times as they'd like! Once all the snowflakes are dry, I stack them up and iron them one more time before hanging them up in the windows.


Hope you are having a cheery and bright holiday season so far!


Sunday, December 9, 2012

Maple Brown Sugar Scones

I adore scones. But until about a year ago, I had never tried to make them myself - I assumed they were one of those things that you just couldn't make in a home kitchen.  I was content to let coffee shops and bakeries charge me whatever they liked for scones because I loved them that much. Then I found out how easy they were to make at home - and I was 100% hooked.

There's nothing like getting up in the morning and enjoying a warm, fresh-from-the-oven scone. And if the idea of jumping out of bed and mixing up a batch of scone first thing feels a little too Stepford Wives, don't worry - these freeze amazingly well, so all you have to do is stumble out of bed and toss one into the oven on your way into the shower. By the time you're done: fresh, homemade scones to start your day off on a good foot.

Maple Brown Sugar Scones
adapted from Alice Waters' The Art of Simple Food

*2 cups flour (I used half pastry flour, half all purpose)
*2.5 tsp baking powder
*1/2 tsp salt
*1/4 cup brown sugar, plus more for topping
*2 TB maple syrup
*1 cup heavy cream, plus more for topping
*1/3 cup maple yogurt
*1/8 cup oatmeal

Preheat oven to 400 degrees.

Mix the flour, baking powder, salt, and brown sugar together until evenly blended. Add the maple syrup, heavy cream, and maple yogurt and stir until combined. Turn out onto a floured surface and knead very briefly, until dough holds together.

Form into a 8" circle (no need to be exact here), and cut into 8 triangular pieces.*  Place on a baking sheet lined with parchment paper and brush cream on top of each piece. Sprinkle liberally with brown sugar and top with oatmeal.

Bake for about 17 minutes, until scones turn golden brown.

*If you plan on freezing them, stop here. Freeze them on a baking sheet, then when they're frozen and the danger of them sticking together has passed, toss them into a freezer bag. When you're ready to bake them, brush the cream on and add the topping, then bake at 400 degrees for about 20-25 minutes.


Once they come out of the oven, sit back with a cup of coffee, and enjoy your scones! There are so many ways you could vary these to your tastes... add pomegranate seeds or oatmeal to the dough to give it a little extra texture, or add some cinnamon or nutmeg if you'd like it to be a little more spiced.

Let me know if you make these - I'd love to hear how it goes. Hope you have a wonderful day!

Tuesday, December 4, 2012

Wrap A Gift With A Paintchip Garland

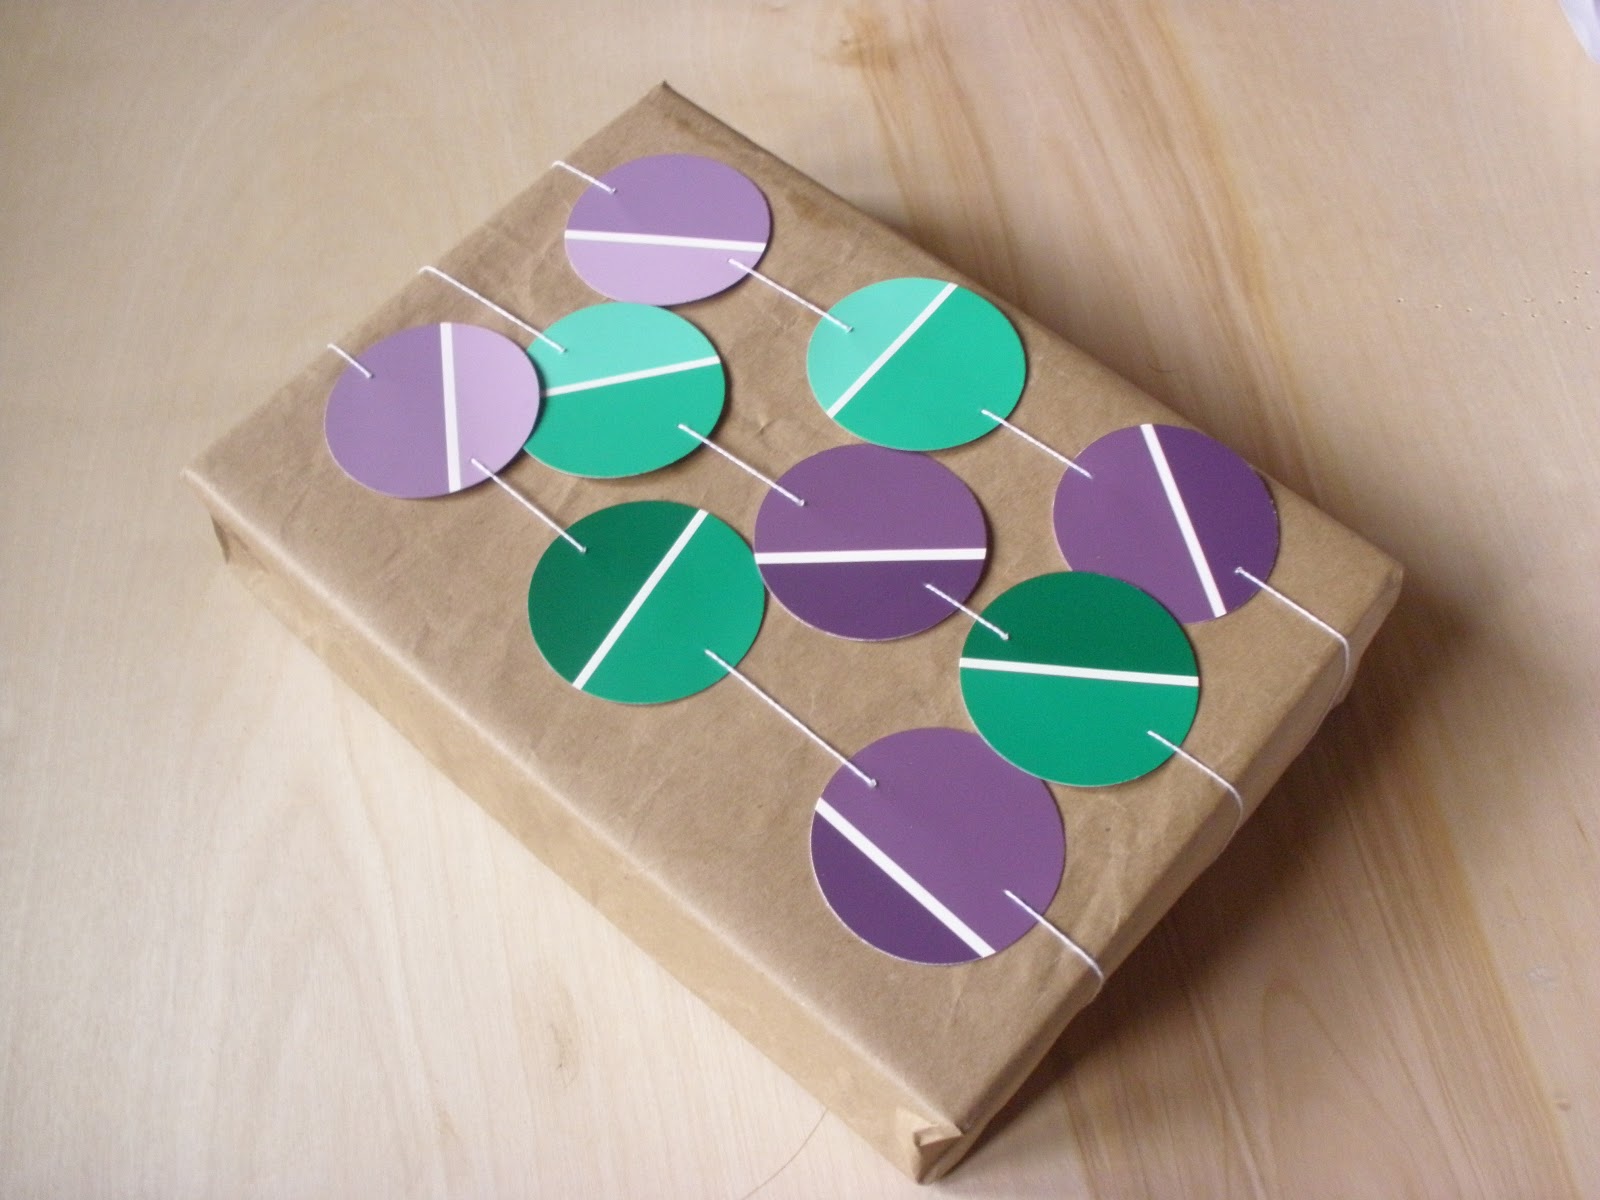
I have had a rainbow of paint chips lying around the house for a few weeks now, ever since I made a triangle paint chip garland to hang in my bedroom. And today when I was wrapping a gift for a friend, they totally came in handy.

I almost always wrap gifts in plain brown craft paper, then find quirky ways to add interest to the wrapping. Looking at all the paint chips I had, I decided to get out my circle punch, a needle, and some thread to craft a garland to wrap around the gift.

If you want to try this, all I did was punch several circles of varying colors out of the paint chips. If you don't have a circle punch, trace a glass or bottle that's about the size you want, and cut them out by hand.


Then, grab your needle and thread, and push the needle down through the front of the paint chip and up again on the other side. There's no need to tie a knot after your first circle... the paper is so thick that they will stay put pretty well.


Once your garland is as long as you'd like, tie a knot on the last paint chip circle and wrap it around your gift!


I also tried this with a triangle garland, and I loved the look of that, too....

I love that this project is totally free - use a grocery bag turned inside out if you don't have any craft paper lying around - the paper I used came from some leftover packaging. And I think this could also look great zig-zagging across your front door, wrapped around your Christmas tree, or in so many other places... where would you put yours?

Saturday, December 1, 2012

DIY Monogrammed Paperclay Ornaments


Lately I have been experimenting with  paper clay. I found several different sets of instructions online, and finally developed my own recipe, which is simple to make and easy to work with. Its an air drying clay which, when dried, looks kind of like grown up version of paper mache. I love using it to make small items like these ornaments.


Here's what you'll need to make this clay:
*1 roll of toilet paper
*1 bottle (6oz) white glue
*1/2 cup flour
*2 cups joint compound
*large bowl
*gallon ziplock bag


How to make it:
1. Unroll about three quarters of the roll of toilet paper into a bowl filled with water. Let it sit for about a minute.
2. Pull a small handful of the paper out and squeeze as much water as you can out of it. Then, honestly, comes the slightly tedious part... shred the toilet paper into very small pieces... the smaller the better. Any large pieces you leave will become chunks in the clay, so it is important to have the paper shredded finely. As you shred, toss the pieces into a gallon sized ziplock bag.
3. Add the half cup of flour, the bottle of glue and the 2 cups of joint compound into the bag. Seal it and knead the mixture until it is smooth. When I did this step, I placed the bag with the clay into a separate ziplock so that if it leaked, it wouldn't be a huge mess.  After you've kneaded it, the consistency should look about like the photo above.

And that's it! Now you have clay that you can use to make anything you like. My favorite things to make with it so far are these monogrammed ornaments.

To make these, simply pinch off a piece of clay about the size of a marble. Roll it between your palms to make a ball, then flatten the ball between two layers of parchment paper. Use a needle to make a hole for hanging your ornament later.

Now your pendant is a blank canvas for whatever you'd like to do! Use alphabet stamps to stamp your initials on the clay. If you don't have any stamps, you can use a mechanical pencil (without the lead) as a stylus to carve initials or other shapes into the clay... or you can leave it blank and paint the initial on after it is dry!

(If you have trouble with your clay being too sticky and "grabbing" on to the stamp, I recommend letting your clay air dry for about half an hour, then coming back to it and trying again. Once it is slightly drier, you will be able to make a clearer impression with your stamp or stylus. These pendants will take about 24 hours to dry, so you have plenty of time in the beginning to get your stamp just the way you want.)

Once your ornament is dry, get creative and paint it anyway you like! I also recommend adding  a protective layer of ModPodge (or any other glaze; I used Liquitex Gloss Medium and Varnish). There are so many ways you could decorate these...


Once you're done, you can hang these as ornaments from your tree, or give them as gifts. Hang one on a ribbon as a necklace for a child in your life (the joint compound makes this clay dry very hard; certainly tough enough for a child to play with); place one on a slim chain as a necklace for a friend; or  place it on the ribbon you use for gift wrapping instead of adding a gift tag.

Hopefully I will be able to add more photos to this tutorial soon; the rain here in California hasn't let up for days, and its been hard to get good pictures.

Thanks for stopping by, and have a great day!

Related Posts Plugin for WordPress, Blogger...