So, I'm happy to let you know that I'm launching a new site today called Whisk Paper Needles, at http://whiskpaperneedles.com/. Stop by, hang out, and stay a while - can't wait to see you there!

Monday, October 14, 2013
Moving On
I haven't posted here in quite a while, and I've been taking that time off to think about what I want blogging to look like for me. In the end, while writing here has been so much fun and a wonderful introduction the blogging world, this site is no longer a good fit for what I'd like to be doing.
Thursday, June 27, 2013
Ways to Create: Making Art Journals
I've been working with elementary-aged kids for over five and a half years now, and one of my favorite parts of my job is being able to do creative projects with them. I have seen kids bloom through art projects and I love to connect with them on that creative level! I don't believe in micromanaging their art to get a specific outcome - so most of my projects are based on giving them a fun new way to create and then getting out of their way. I thought I'd start sharing some of those projects here with you. Many of them are messy, none of the products from these projects will look alike, and all of them will get kids creating in whatever way is right for them!

Art journaling is something I have loved for a while now, and so this summer I decided to give art journaling with kids a shot. I know I love journaling in books that I have made myself, and I wanted to give the kiddos at work that same opportunity. So, we spent some time this week learning how to create tape-bound journals - and as always when doing art projects with kids, their creativity blew me away. They created pages thick with a huge amount of tabs, pockets, fold outs, and envelopes (for their Top Secret writing)...

And their journals were just awesome.
 This is actually a pretty simple project to do, and the kids loved it, so I thought I would share how we made them here.

 First, I talked with the kids about journals and what sorts of things they thought would be fun to include in their journals. When they wanted to make specific things, like envelopes and tabs, we brainstormed together different ways to make the features they wanted (folding pages in half and taping them to make envelopes, taping three edges of a scrap of paper onto a page to make a pocket, folding tape over the edge of a page to make a tab, etc.). Then, they made all of their individual pages. A page consisted of one piece of paper, folded in half, and cut in size they wanted their journal. We kept the supplies simple, and just used paper, scissors, and craft tape.
We all met back together when they were finished, and I showed them how to use tape to bind their journals. Its important for this step that they line their pages up pretty precisely, as shown
below. Some kids who struggled with this step found that working with a partner really helped - one person would hold the pages so that they lined up exactly, and the other partner would tape them together.
 After the first two pages were taped together, they flipped them so that the strip of tape was folded in half. Then they continued adding pages like this until their journal was as thick as they liked.
Once all their pages were bound together, we used a thicker piece of tape folded over the entire edge to reinforce the binding.

The best part about this project is how much the kids absolutely love their journals! We store them at camp and pull them out when we get back from field trips or when we have some down time in our day, and the can't get enough of writing and drawing in them. And at the end of the summer, the kids will have a beautiful record of all their adventures and the fun they had. What could be better than that?
Sunday, June 23, 2013
Our Mini Rooftop Garden
 My husband and I both grew up tending gardens and eating their produce all summer long. I remember so clearly how it felt to head outside with a book, stuffing the pockets of my jean shorts with spinach on my way past the garden. I would climb up onto a comfortable tree limb in my backyard and spend the afternoon reading and snacking on the fresh-picked leaves. Later, at dusk, my mother would send me out to water, and I loved the feeling of dust-dry dirt against my feet as I held our green garden hose.
 My husband has similar fond memories of growing up tending a garden, and we've wanted a garden of our own for a long time now. We moved into the apartment we live in now a couple of months ago, and we LOVE it here. The only downside is that we don't have a backyard - something we both desperately wanted.
 We decided to ask our landlord if we could have the use of a small deck that's at the back of the house (we live in an beautiful built home that's been split into apartments). He had no problem with that, and so we started a small rooftop garden a couple of months ago. It's tiny - really a just a few tomato plants, some lettuce, basil, and some herbs - but we are so fond of it.
We've already eaten several meals seasoned by the herbs, and one wonderful salad of baby greens, but I'm most excited for the tomatoes. We have a few different varieties that we got from our local seed bank, and I can't wait to try them. There's something hugely satisfying to me in growing my own food - even if it's just a tiny amount. It's nice to finally get my hands dirty and realize that just because I can't have a garden like the one I remember growing up doesn't mean I can't have a garden at all. Container gardening like this is totally new to me; if you have any tips, let me know!
 |
| my sister officiating our wedding ceremony - you can just make out the pots behind our legs (photo by our wonderful friend, Juliet). |
Tuesday, May 21, 2013
DIY Sidewalk Chalk Paint
I've been working with elementary-aged kids for over five and a half years now, and one of my favorite parts of my job is being able to do creative projects with them. I have seen kids bloom through art projects and I love to connect with them on that creative level! I don't believe in micromanaging their art to get a specific outcome - so most of my projects are based on giving them a fun new way to create and then getting out of their way. I thought I'd start sharing some of those projects here with you. Many of them are messy, none of the products from these projects will look alike, and all of them will get kids creating in whatever way is right for them!

 This art project is one that I've done with the kids for a long time. Its a great lazy summer day activity, and one that the kids absolutely love. To make your own sidewalk chalk paint, simply mix together equal parts cornstarch and water in a cup, then add food coloring. Stir together with a paintbrush, and then get painting!
One thing that I love about this project is that it engages kids on a lot of different levels. Super artsy kids can go to town creating their own masterpieces, and very social kids can work together with their friends. One boy I work with who loves to push boundaries and can be a real behavior issue at times spent the entire activity sitting near the food coloring, adding a drop at a time into his cup of paint and watching the colors change. It was great to be able to give him the space to experiment on his own.
 I do let the kids have free access to all of the supplies for this project. I teach some basic color mixing (red + yellow = orange, etc) and assist kids who ask for help, but I think it's good for them to be able to experiment and interact with the supplies independently. So many times, the art projects they do in school require tracers and have specific rules about what they can and can't make. There's value to learning how to follow directions, but I believe there's also value in having space to experiment and create on their own.
Have fun making this and painting the town with the kids in your life!

Wednesday, May 15, 2013
Celebrate Summer - Etsy Treasury
It's been a busy couple of weeks, but with the weather getting steadily warmer and the school year coming to an end out here in California in just 3 more weeks, I've got summer on my mind! I have no affiliation with any of these shops - but I do think that the start of summer is a great thing to celebrate. Here some fun, affordable ways to bring a little summer into your life.


.
Have you had any fun etsy finds lately? Tell me about them in the comments below!Tuesday, April 30, 2013
Homemade Pop Tarts
 It seems like I am always on the lookout for homemade versions of grab-and-go type foods. My husband and I are both often rushing out the door, and I know that if we don't have easy food to grab on the way, we wind up spending way to much on food while we're out and about. We always try (with vary success..) .to pack lunches on weekdays instead of buying them - so I usually spend some time on the weekends baking and making snacks to tuck into our lunches for the week.
This weekend I decided to try a recipe from Smitten Kitchen - I love Deb's writing and her recipes are always amazing! Homemade pop tarts sounded almost too good to be true; I love the idea of the commercial ones, but to me they always taste so flat and stale. These homemade pop tarts are what you wish the commercial pop tarts would be - a crispy, flaky crust, stuffed with delicious, fresh filling. I'll definitely make them again - and next time I'm thinking of using Nutella as a filling. Less healthy, but doesn't it sound delicious?
 Homemade Pop Tarts
For the Pastry Dough:
*2 cups all purpose flour (although you could easily substitute whole wheat)
*1 TB sugar
*1 tsp salt
*1 cup unsalted butter (2 sticks)
*1 egg
*2 TB milk
*1 TB heavy cream (substitute milk for this if you don't have cream on hand)
For the Fillings:
Jam Filling
*3/4 cups jam (I used blackberry)
*1 TB cornstarch
*1 TB cold water
Lemon Cream Cheese Filling:
*4 TB lemon curd
*4 TB cream cheese
To make the dough, whisk together flour, sugar, and salt. Cut the butter into small pieces, then use your fingers, a pastry cutter, or food processor to mix in the butter until it is in pea sized lumps. If using your fingers, simply pinch the pieces of butter between your thumb and fingers. Whisk the egg, milk, and cream together in a separate bowl, then mix into the flour and butter mixture. Knead briefly on a well floured counter until dough holds together. Split the dough into two pieces, wrap in plastic, and refrigerate while you make the fillings.
To make the jam filling, whisk together the cornstarch and cold water and pour into a small saucepan. Stir in the jam, and bring the mixture to a boil. Simmer for about 2 minutes, stirring constantly. Remove from heat and let cool.
Preheat your oven to 350, and remove the dough from the refrigerator. Roll out on a well floured surface until it is about 1/8" thick. Cut out rectangles of dough (I used a 3"x5" index card for guidance so that I would get rectangles that were exactly the same size - use anything that is the size you'd like your finished pop tarts to be).
Assemble the tarts by placing about a tablespoon of filling in the center of one rectangle, leaving at least quarter inch perimeter of dough around the edges. For the cream cheese and lemon curd pop tarts, I placed half a tablespoon of cream cheese first, then added half a tablespoon of lemon curd on top. Dip a pastry brush in water and brush generously around the perimeter of the rectangle. Place a second rectangle of dough on top and press firmly with your fingers to seal the dough on all sides. Press with a fork around all outside edges.
Place the tarts on a baking sheet lined with parchment paper. Slit the tops of each tart (or use a fork to poke holes in the top) - otherwise they will poof up in the oven. Bake for about 20 - 25 minutes, until golden brown. Make sure to let them cool before tasting - the filling packs a lot of heat!
As Deb (on Smitten Kitchen) mentioned, I tried the tip from King Arthur and dipped my dough trimmings in cinnamon sugar, then baked them. They were delicious - almost like little bites of fried dough!


Tuesday, April 23, 2013
Beekeeper's Quilt Update
 Do you remember a couple of months ago, when I wrote that I'd started a new knitting project? Well, I'm here with an update! I started the Beekeepers Quilt by Tiny Owl Knits in late February: it's an adorable quilt pattern made of hundreds of tiny hexagons knit in the round and stuffed with wool. Each individual hexagon (aka hexapuff!) takes me about 35 minutes and 14 yards of wool to complete - and in the two months since I started the project, I've knit a little over 100!
Here's what 102 hexapuffs look like all piled up:

And then arranged into a quilt:

Honestly, the arranging is one of my favorite parts! I haven't stitched any hexapuffs together yet because it is so much fun to play with the colors and patterns and lay them out in different ways. It's hard to see in the pictures, since they're taken with my iPod (my camera has officially bit the dust...), but most of the yarns I've used are slightly heathered - I really like the depth it adds. I'm hoping to add some tweed yarn into the mix next.
If my math is correct, to make a finished blanket I'm going to need 880 hexapuffs, so I'm almost an eighth of the way done. I'll make sure to keep you updated along the way!
Thursday, April 18, 2013
Ways to Create: Double Portraits
I've been working with elementary-aged kids for over five and a half years now, and one of my favorite parts of my job is being able to do creative projects with them. I have seen kids bloom through art projects and I love to connect with them on that creative level! I don't believe in micromanaging their art to get a specific outcome - so most of my projects are based on giving them a fun new way to create and then getting out of their way. I thought I'd start sharing some of those projects here with you. Many of them are messy, none of the products from these projects will look alike, and all of them will get kids creating in whatever way is right for them!


I was lucky enough to have access to a photo printer, so once they were done taking pictures, they chose the two they wanted to use and I printed them. Kids then cropped them however they liked and glued them together:

Let me know if you try this with your kids; I'd love to see your projects!

all photos shown in this post are used with permission
Tuesday, April 9, 2013
Moving, Family Traditions, and Chocolate Espresso Cupcakes!
 |
It's been fun to carry on all our little traditions in this new space. There's something so important to me in doing all the little things - they really become the story of who you are as a family. A lot of our traditions revolve around food (my husband works as a chef) - and one of my favorite traditions is always cooking a big breakfast together every Sunday morning. We try to make it a point to have it be a special meal, especially since Sunday marks the first day of Russ' work week, and he leaves about an hour after breakfast is done.
The weekend that we moved, though, we didn't have a chance to make a our usual Sunday morning breakfast, as we hadn't even unpacked most of the kitchen at that point. I was pretty bummed about it, as this is something we really never skip. So I unpacked like crazy that day, and decided to make breakfast for dinner that night. The only part I couldn't include was our traditional cup of coffee - so I improvised by making chocolate espresso cupcakes for dessert!

I adapted a recipe from Art of Dessert; you can find her original recipe here. This recipe makes 30 cupcakes.
Chocolate Espresso Cupcakes
1 cup butter, softened to room temperature
1 3/4 cup sugar
2 eggs
2 tsp. vanilla extract
1 cup buttermilk or 1 cup whole milk with 1 Tbs. lemon juice
1/2 cup strong coffee, cooled
2 cups flour
3/4 cup cocoa powder
1 tsp. baking soda
1 1/2 tsp. baking powder
1/2 tsp. salt
Preheat oven to 350 degrees F. Line 3 muffin pans with cupcake liners. Beat together butter and sugar till light and fluffy. Slowly add eggs one at a time. Sift together flour, cocoa powder, baking soda, baking powder and salt. Combine the buttermilk and coffee together. Alternate adding the flour mixture and buttermilk mixture. Pour into the prepared pans. Bake for 12-15 minutes or until a toothpick inserted in the middle of the cupcake comes out clean.
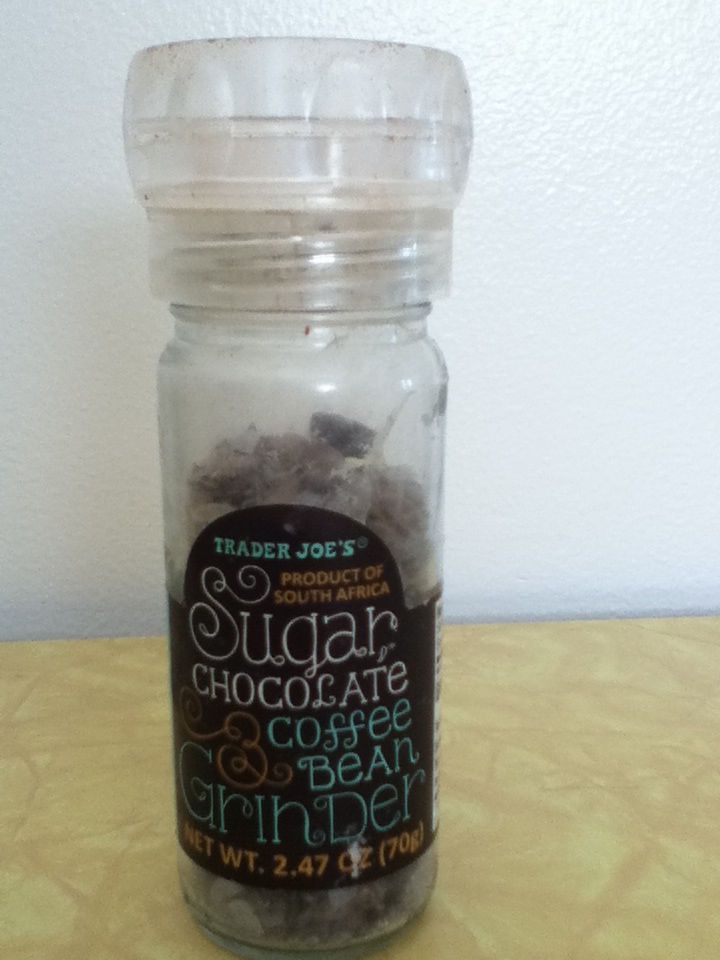 I added a basic cream cheese frosting (although the original recipe calls for a Kahlua Espresso frosting, which also sounds delicious!), then topped it with Trader Joe's Sugar, Chocolate, and Coffee Bean Grinder - which is such a nice novelty item to have on hand. I use it on so many things! If you haven't seen one, they are these great little spice grinders filled with white and brown sugar crystals, dark chocolate, and coffee beans. I use it to top ice cream and all kinds of other desserts.
If you've noticed that my pictures look a little off, it's because my camera got slightly damaged in the move. These photos are from my iPod - but hopefully my camera will be back in the game soon! I'm so glad to be settling into my new space, and very happy to be back to posting in this space as well.
Tuesday, March 5, 2013
Color Run!
I have always had a lot of things that I want to do. I will make vague plans to do all kinds of things and have all kinds of adventures. Usually, though, the next step is that I talk myself out of doing any of them: that class I want to take is too expensive. That camping trip I want to take is too impractical. And who knows if it would even be fun... there are always plenty of reasons why is just doesn't make sense to go out of my way to make these things happen.

This year, though, Russ and I made a deal: we were going to start going on more adventures. Starting in about November, I have been trying to step out of my comfort zone: taking those classes, going on those camping trips, starting a blog even though I wasn't sure if it would succeed. It has been hard to change my thinking from finding reasons not to do things to finding ways to make them happen. But the more I do, the happier I feel.

So, in that spirit, last weekend we went to Candlestick Park in San Francisco and participated in our first Color Run - a 5k where you get doused with colored powder every kilometer. We got there late (traffic was crazy!), but had a blast - it was so much fun, and there was a really great, friendly vibe at the whole event. People were high-fiving each other everywhere and everyone was just having a good time.

This also got us inspired to start training so that next year, we can run it as a race instead of as a fun run. My mother - who is always an inspiration to me - just started a Couch to 5k program this week, and while we can't actually go on runs together (she lives in NY), I'm excited to be training at the same time.

Tuesday, February 26, 2013
Work in Progress: The Beekeeper's Quilt
I love to knit, and for a while now I have been looking for a good, long-term project. Something portable, so I could work on it in the car or on the bus, but still substantial, and easy enough to pick up and knit while talking or watching a movie. Finally, I found this: The Beekeeper's Quilt.
Each hexagon is knitted separately, stuffed with wool batting, and then stitched together, so this is a definite long term project. I started knitting the small hexagons (the designer calls them "hexapuffs," which I think is adorable) two days ago, and they are totally addictive! Here's my progress so far:

I've only knit about a dozen so far, but they all use scrap yarn that I've had lying around the house for a while - I'm excited to finally get around to using some of it! Its perfect for small amounts of yarn that are leftover from other projects. There's a real satisfaction that comes with finishing each one, and I can't wait to make some more. Here's how they look all laid out:

What do you think?
 |
| photograph from tinyowlknits.com; click on the link above to see the full pattern and information about the project on her website. |


What do you think?
Tuesday, February 19, 2013
Book Review - Make Your Place: Affordable, Sustainable Nesting Skills
To be honest with you, I had planned a quite different blog post for today. My weekend, however, got a little sidetracked by food poisoning. When I realized that I wasn't feeling well, my first instinct was to grab Make Your Place: Affordable, Sustainable Nesting Skills. Its one of many reference books that we keep in the house, but it's by far the one we go to the most, so I thought that I would share it with you here. There are tons of great tips on how to make your own, natural cleaning supplies, and as I mentioned above, this is the first book I'll look to when I'm not feeling well.

Make Your Place is a small, handwritten book that covers three main areas: health, cleaning, and gardening. I use the health section the most, by far. From this book, I have learned how to make tinctures, salves, and teas to treat many medical conditions. You do have to put some time in upfront to source the plants and supplies you'll need, but it has definitely been worth it for me. My husband and I have used ideas from this book to treat first aid emergencies as well as to manage chronic conditions - for instance, my husband's eczema, which haunted him throughout his childhood and young adulthood, and which has now disappeared. These natural remedies have really worked for us!
The cleaning and gardening sections are also great - there are tons of great ideas, and they're presented in a very doable way. If you're just looking to get started in making the switch to more natural cleaning, there are plenty of easy and cheap ideas to try out, even if you don't want to jump in with both feet just yet.
The tone of the book is fun, light, and conversational, and all in all, it makes a great addition to your home library. The copy I own has been dog eared and pretty beaten up - which for me, is a sign of a well-loved book. Which books do you find yourself referencing again and again? Let me know in the comment section below!
Subscribe to:
Posts (Atom)
